Why we need automated tests
Imagine you are trying to benchmark your website and find out the full browser page load times of your start page when it is loaded 100 times. I guess no one would want to manually click for 100 times, and record the time for each click. NodeJS could help you to do this kind of simple repeatedly job. In addition to that, the tool would give more accurate and faster results than a human tester can achieve this.
This blog post gives you insights how the open source solution NodeJS eliminates manual testing tasks. You will learn everything, from the installation, configuration through writing simple test cases and their automated execution.
How to prepare the environment
You need Chrome, NodeJS, and Puppeteer to run this automation tool.
Downloading Chrome
Downloading NodeJs
Downloading Puppeteer
To install Puppeteer, open the terminal then type in any platform (Windows, Mac, Linux):
npm I puppeteer

How to run the script
Open the terminal change directory to the file location (desktop), then type:
node <name of your script.js>

Use-cases for NodeJS
Benchmarking
This script is a great tool for load testing. It can open the same web page repeatedly, and get the load time for each time, then calculate the average load time at the end.
Automated regression testing
This script is a really useful tool for testing a website, once a new version is updated. The script can ensure that all functions are running properly, as expected.
Automation of repetitive tasks
This script can run through all the simple but boring repetitive tasks for you accurately and quickly.
Pros and cons
+ Free Both NodeJS and Puppeteer are free open source, for all platforms.
+ Saves time In general, the automation tool runs tests faster than testers can do them manually. Also, the tool frees up the tester for more important tests.
+ Steady performance The automated test eliminates human error by performing a test in exactly the same way each time.
+ Quick feedback The automation tool can give feedback as soon as the test is done.
– Works only on Chrome Puppeteer works only on Chrome browser.
– Background required Writing the script requires some programming skills.
– Limitations The automation tool can’t check images. Also, it only does what it’s programmed to do.
– False result/alarm When the automation tool doesn’t run as expected, it can give back a false result or false alarm.
A sample script
Overview

Navigate to the Service drop-down menu, then click on Performance.

Type Test in the search box, then press Enter.

Repeat this step 3 times.
The script will create a log file in the current directory, using the current date and time as the file name. The log will include the time for each step, and the average step-time from 3 steps.

The loop (lines 60—94)
Line 62–64 Setting the browser visible and the window size to be 1300:1000 for the tester.

Explanation
Lines 66–70 Write the count of the loop both on the terminal and the log.
Lines 77–82 For the second step, click on Performance in the Service drop-down menu, then start the timer before pressing Enter. Stop the timer after the web page is fully loaded, and add the time to the total2 for calculating the average time at the end.
Lines 72–75 For the first step, go to the web page that’s given in the url. It will start a timer before going to the page, and stop the timer once the web page is fully loaded. Then add the time to the total1, which will help calculate the average time at the end.
Lines 84–91 For the third step, type text in the search box then, again, start the timer before pressing the Enter key, to measure the response time of the entire step. Stop the timer when the page is fully loaded.
Line 93 Closing the browser.
Defining variables before the loop (lines 38–49)

Lines 40–41 Creating a timer for the first event. Defining the url for the webpage.
Line 38 Defining the number of times runs for the loop.
Lines 43–45 Creating a timer for the second event. Defining the Selector for the drop down menu and the selector for clicking.
Lines 47–49 Creating a timer for the third event. Defining the selector and the text for the search box.
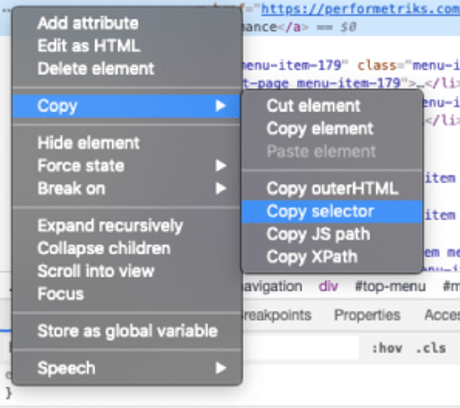
Note: How to find the selector

Right click on the element, and click on Inspect.

Navigate to Copy, then click on Copy selector.
Keep doing the good work! Happy Performance Engineering!

コメント